How We Guarantee Our Work?
Introduction:
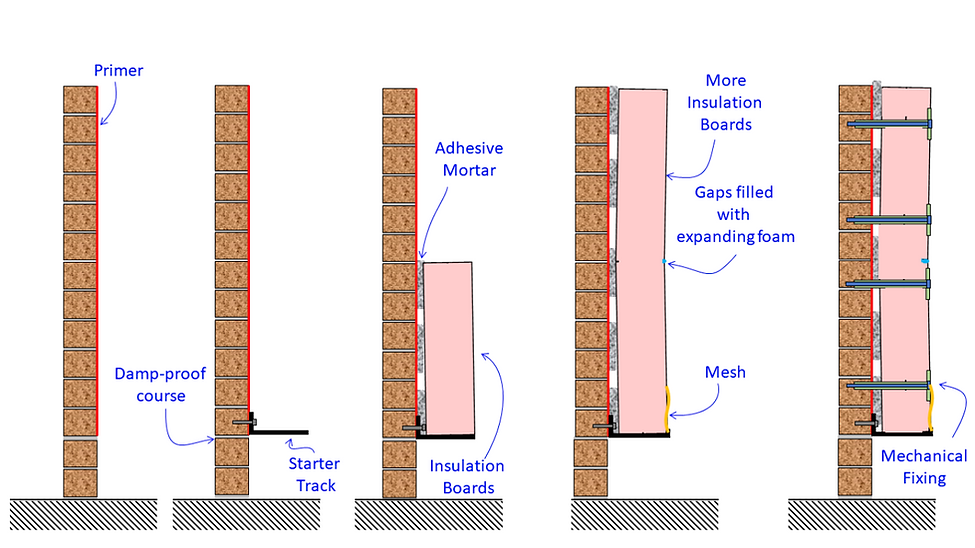
External Wall Insulation (EWI) is a system implemented externally on a property's wall. It involves three main steps: first, installing insulation by applying adhesive to the wall and securing it with mechanical fixing; second, applying a base coat with fiber reinforcing mesh to prevent cracks or movement in the wall; and finally, applying rendering according to the customer's preference, either monocouche or silicone rendering.
The diagram shows the steps involved in insulation process. It consist of three steps described below;

Securing insulation to wall:
What can go wrong in this process?
Installing insulation panels securely onto the exterior wall is crucial to prevent any potential movement within the system. Properly applying adhesive during installation is essential to avoid any shifts. Void spaces behind the insulation boards can lead to unwanted airflow, undermining the insulation's effectiveness. While mechanical fixing might not be used entirely. Moreover, mechanical fixing can be employed in hollow or unfilled spaces behind the insulation, which fails to fulfill the intended purpose of utilizing mechanical fixings. Additionally, ensuring that mechanical fixings are securely fastened to the exterior wall is imperative.
This is our practice?
Before applying any materials, we conduct a thorough assessment. Initially, we examine the condition of the substrate, identifying any loose elements for removal before proceeding to the next stage. We then evaluate the levelness of the substrate, addressing any significant irregularities with a specialized leveling mortar containing a polymer modifier. Following this, a pull-out test is performed to determine the necessary length & strength of mechanical fixings for the project. Next, insulation panels are fixed using a flexible, high-strength, and vapour-permeable adhesive. This adhesive is applied around the perimeter of the insulation, with three specific points in the center designated for mechanical fixings. Once the insulation is securely applied and the adhesive has set, appropriate holes are drilled, typically six per board in key areas, ensuring adhesive coverage behind the insulation. Another pull-out test is conducted to confirm the adequacy of the mechanical fixings, ensuring they are firmly secured against the insulation to prevent any movement within the system.
Problem created after time lapse?
If all steps are executed correctly, external factors can still pose a threat to the system's integrity over time, often unnoticed. One primary cause of EWI insulation movement may arise from internal water ingress or leaks, gradually compromising the adhesive and potentially affecting specific or entire areas. While the system is waterproof externally, significant internal movement during building works, such as drilling or vibrations, can lead to adhesive breakdown and loosening of mechanical fixings.
All insulation systems are designed to fit beneath existing eaves, but certain configurations may result in insulation protrusion. In such cases, specialized verge trim is utilized to mitigate this issue. Any damage or breaks in the trim can lead to water ingress, compromising the entire system.
Photos & Document?
We adhere to the highest standards when handling your most valuable asset. To ensure alignment with industry standards and accreditation boards, we meticulously photograph each stage of the entire project, presenting these images to you upon completion. This practice reinforces the level of care and professionalism employed throughout the construction of the EWI system. Additionally, we furnish customers with a comprehensive document containing evidence of adhesive, mechanical fixings, and insulation application, accompanied by images of each step to substantiate our commitments.
Coating Insulation:
What can go wrong in this process?
Incorrect application of base coat on insulation may result in gaps on the boards and reduced efficiency. Failure to use fiberglass reinforcing mesh can lead to cracks in both the base and top coat after drying. Improper attachment of the fiber mesh can disrupt the process. Low-quality topcoat or uneven application may cause bumps and negatively impact the final step.
This is our practice?
Once the insulation is flawlessly installed and passes the pull-out test, we proceed to apply the basecoat meticulously, ensuring complete coverage of each insulation board. The basecoat serves a dual purpose, acting both as a base layer and adhesive with its high strength, elasticity, and vapor permeability.
Next, we lay fiberglass reinforcing mesh over the basecoat, followed by another layer of basecoat to fully encapsulate the mesh, leaving no gaps. This mesh is highly water-resistant. Afterward, we apply the topcoat, ensuring proper leveling, and allow ample time for drying before proceeding to the final step. The topcoat enhances adhesion between the basecoat and render, while also being vapor permeable and solvent-free.
For monocouche rendering, we scratch the topcoat to prepare it for rendering, ensuring strong adhesion. For silicone rendering, we smooth the topcoat to prepare it for rendering, also ensuring strong adhesion.
Problem created after time lapse?
If all steps are executed correctly, external factors can still pose a threat to the system's integrity over time, often unnoticed. One primary cause of EWI insulation movement may arise from internal water ingress or leaks, gradually compromising the adhesive and potentially affecting specific or entire areas. While the system is waterproof externally, significant internal movement during building works, such as drilling or vibrations, can lead to adhesive breakdown and loosening of mechanical fixings. It will create cracks on base coat and destroy fibreglass reinforcing mesh.
All insulation systems are designed to fit beneath existing eaves, but certain configurations may result in insulation protrusion. In such cases, specialized verge trim is utilized to mitigate this issue. Any damage or breaks in the trim can lead to water ingress, compromising the entire system.
Photos & Document?
We adhere to the highest standards when handling your most valuable asset. To ensure alignment with industry standards and accreditation boards, we meticulously photograph each stage of the entire project, presenting these images to you upon completion. This practice reinforces the level of care and professionalism employed throughout the construction of the EWI system. Additionally, we furnish customers with a comprehensive document containing evidence of adhesive, mechanical fixings, and insulation application, accompanied by images of each step to substantiate our commitments.

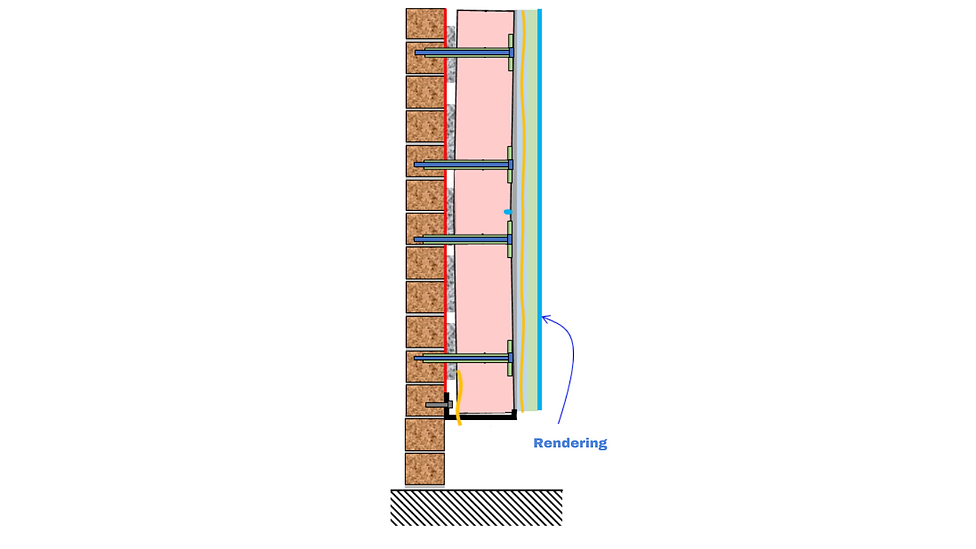
Rendering:
What can go wrong in this process?
Selecting an inappropriate rendering grade and quality can result in compromising the entire applied system. Failure to achieve a smooth and desired render finish may result in wall stains, render detachment, and attempting to patch fallen bits of render can detract from the overall appearance, potentially necessitating a complete re-rendering of the house. Not using primer ahead of applying the final render.
This is our practice?
After the topcoat is fully dried and smoothed, we assess its readiness for the desired rendering. we prime the wall in preparation for the render. Using a spray technique, we apply the rendering onto the topcoat and level it according to the requirements of the render system.
For monocouche rendering, we scratch the surface to achieve a smooth and level finish, while for silicone rendering, we utilize a spraying method which facilitates a self-cleaning feature.
Problem created after time lapse?
If all steps are executed correctly, external factors can still pose a threat to the system's integrity over time, often unnoticed. One primary cause of EWI insulation movement may arise from internal water ingress or leaks, gradually compromising the adhesive and potentially affecting specific or entire areas. While the system is waterproof externally, significant internal movement during building works, such as drilling or vibrations, can lead to adhesive breakdown and loosening of mechanical fixings. It will create cracks on base coat and destroy fibreglass reinforcing mesh, which will lead render to fall down and destroy the system.
All insulation systems are designed to fit beneath existing eaves, but certain configurations may result in insulation protrusion. In such cases, specialized verge trim is utilized to mitigate this issue. Any damage or breaks in the trim can lead to water ingress, compromising the entire system.
Photos & Document?
We adhere to the highest standards when handling your most valuable asset. To ensure alignment with industry standards and accreditation boards, we meticulously photograph each stage of the entire project, presenting these images to you upon completion. This practice reinforces the level of care and professionalism employed throughout the construction of the EWI system. Additionally, we furnish customers with a comprehensive document containing evidence of adhesive, mechanical fixings, and insulation application, accompanied by images of each step to substantiate our commitments.
We are proud of the quality materials we utilize and the high level of craftsmanship we employ, instilling confidence in all our customers with a 25-year guarantee.
*Regarding the monocouche render system, we assure all stages of the work except for the final render cleaning properties. While the monocouche render contains anti-fungal and algae components, it may not entirely prevent their occurrence over the specified period due to small water collection pockets and potential algae buildup.